OpenWRT-RPI build setup
Step 1 : Clone the openwrt source tree |
$ mkdir openwrt_src
$ cd openwrt_src
$ git clone https://github.com/openwrt/openwrt.git
|
Step 2: Get the latest updates for the feeds |
$ ./scripts/feeds update -a
$ ./scripts/feeds install -a
|
Step 3: Do make menuconfig |
$ make menuconfig
|
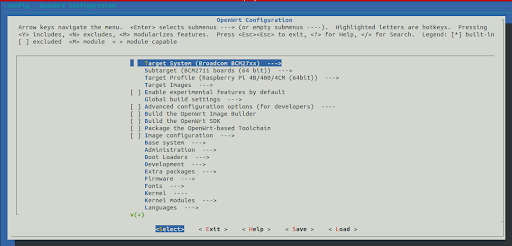
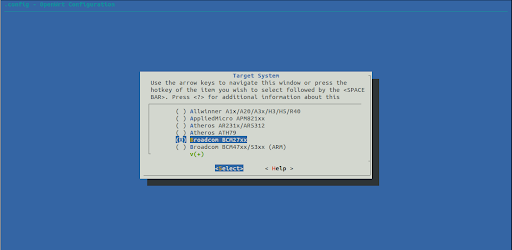
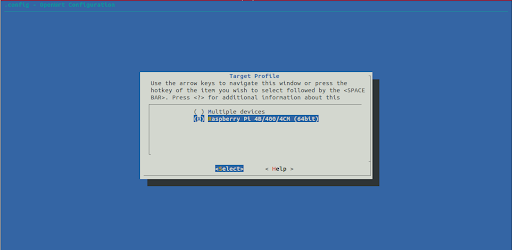
Step 4: Select target System as Broadcom BCM27XX for RPI Model 4B |

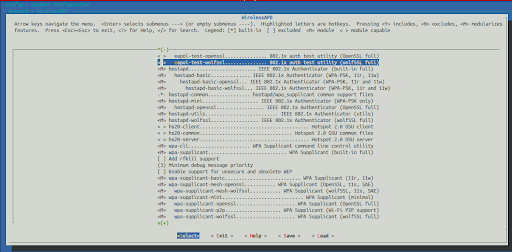
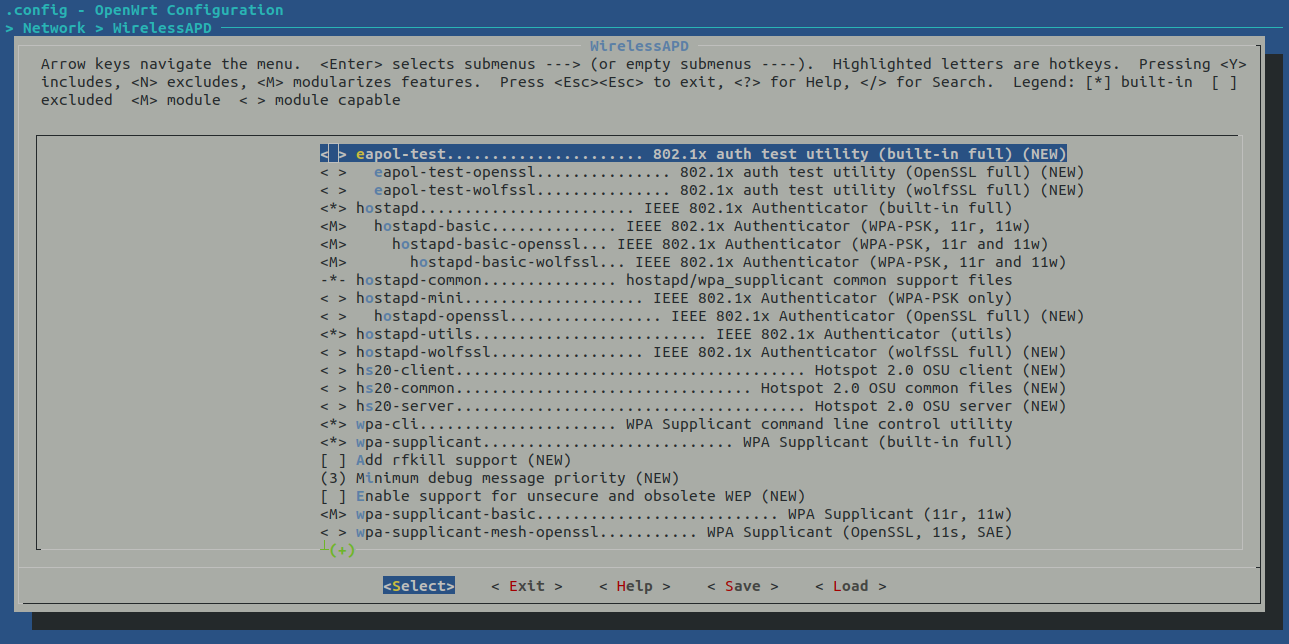
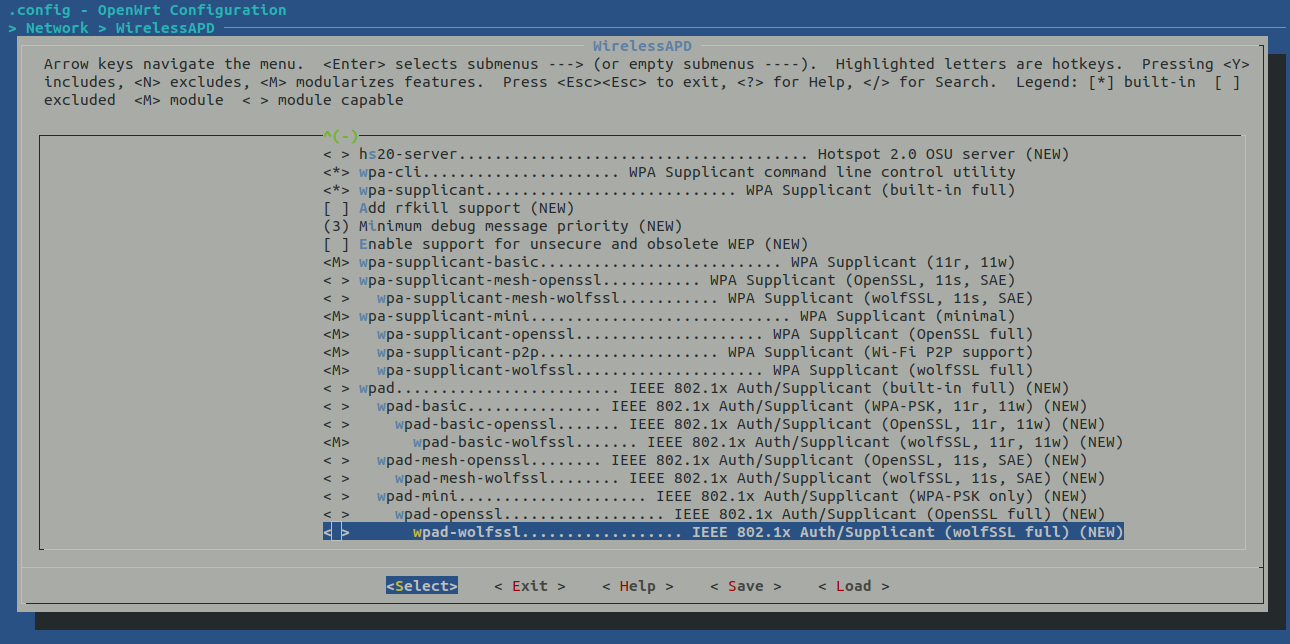
Step 5: Select hostapd and wpa-supplicant |

Step 6: Save the configuration in .config file |

Step 7 : Build the image |
$ make
 make[1] world
 make[2] target/compile
 make[3] -C target/linux compile
 make[2] buildinfo
 make[3] diffconfig buildversion feedsversion
 make[2] package/cleanup
 make[2] package/compile
.
.
 make[2] target/install
 make[3] -C target/linux install
 make[2] package/index
 make[2] json_overview_image_info
 make[2] checksum
|
Step 8 : After build completion image will be stored in bin/targets |
test@test:bin$ tree -d
.
|-- packages
|   `-- aarch64_cortex-a72
|       |-- base
|       |-- luci
|       |-- packages
|       |-- routing
|       `-- telephony
`-- targets
    |-- ath79
    |   `-- generic
    `-- bcm27xx
        `-- bcm2711
            `-- packages

13 directories
test@test:bin$
test@test:bin$ ls -la targets/bcm27xx/bcm2711/
total 52732
drwxr-xr-x 3 test test     4096 Nov 28 01:11 .
drwxr-xr-x 3 test test     4096 Nov 27 22:39 ..
-rw-r--r-- 1 test test      992 Nov 28 08:31 config.buildinfo
-rw-r--r-- 1 test test      263 Nov 28 08:31 feeds.buildinfo
-rw-r--r-- 1 test test 14105707 Nov 28 08:33 openwrt-bcm27xx-bcm2711-rpi-4-ext4-factory.img.gz
-rw-r--r-- 1 test test 14106554 Nov 28 08:33 openwrt-bcm27xx-bcm2711-rpi-4-ext4-sysupgrade.img.gz
-rw-r--r-- 1 test test     3206 Nov 28 08:33 openwrt-bcm27xx-bcm2711-rpi-4.manifest
-rw-r--r-- 1 test test 12869698 Nov 28 08:33 openwrt-bcm27xx-bcm2711-rpi-4-squashfs-factory.img.gz
-rw-r--r-- 1 test test 12870545 Nov 28 08:33 openwrt-bcm27xx-bcm2711-rpi-4-squashfs-sysupgrade.img.gz
drwxr-xr-x 2 test test     4096 Nov 28 08:33 packages
-rw-r--r-- 1 test test     1784 Nov 28 08:33 profiles.json
-rw-r--r-- 1 test test      912 Nov 28 08:33 sha256sums
-rw-r--r-- 1 test test       18 Nov 28 08:31 version.buildinfo
test@test:bin$
|
Step 9 : Flash using dd tool |
Use lsblk command to see what the device connected to the system
If your computer has a slot for SD cards, insert the card. If not, insert the card into an SD card reader, then connect the reader to your computer.
Use lsblk command again, the new device that has appeared is your SD card
Use below command to flash the SD card, if is the image which is to be flashed and of is the SD card where the image is to be flashed.
Step 10 : Flash using Balena Etcher tool |
If your computer has a slot for SD cards, insert the card. If not, insert the card into an SD card reader, then connect the reader to your computer.
Download the Balena Etcher tool from the link https://www.balena.io/etcher/ and extract it and run the binary.
Extract the zip and run the binary
$ ls
balena-etcher-electron-1.7.0-linux-x64.zip

$ unzip balena-etcher-electron-1.7.0-linux-x64.zip
Archive:  balena-etcher-electron-1.7.0-linux-x64.zip
  inflating: balenaEtcher-1.7.0-x64.AppImage

$ ls
balenaEtcher-1.7.0-x64.AppImage  balena-etcher-electron-1.7.0-linux-x64.zip
test@test:dev_tools$ ./balenaEtcher-1.7.0-x64.AppImage
It will launch “Balena Etcher” GUI, select the image and the SD card and click on flash button

Step 11 : Access the RPI using UART cable. See the pin diagram from RPI board below |
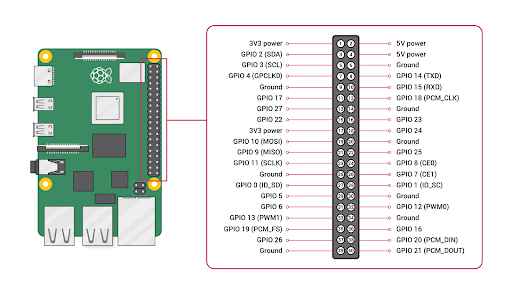
Connect Black cable of UART cable (GND) to pin 6 of RPI
Connect White cable of UART cable (RX of UART) to pin 8 of RPI
Connect Green cable of UART cable (TX of UART) to pin 10 of RPI
Step 12: Run minicom to access RPI board |
$ sudo minicom -D /dev/ttyUSB0 -b 115200
|